
Epson SC-S30600 Error Code 113A: CR Motor overload error
| Code | Error Name | Cause | Check Item | Solution |
| 113A | CR Motor overload error | Overcurrent to the CR Motor was detected. – CR Encoder cable is damaged. – CR Motor cable is damaged. – Irregular load – CR Encoder failure – CR Motor failure |
1. Is the CR Unit being attached correctly? 2. Is there any foreign materials on the CR Unit drive path? 3. Is there any problems such as damaged cable in the connections below? – CR Encoder to SUB Board (CN102) – CR Motor to SUB-M Board (CN1) 4. Does the CR Encoder work properly? Check it using the Service Program. |
1. Re-install the CR Unit. 2. Replace the CR Encoder. 3. Replace the CR Motor. |
How To Fix Epson SC-S30600 Error Code 113A: CR Motor overload error
Re-install the CR Unit.

1. Unlock the CR Unit.
2. Remove the Wiper Cleaner.
3. Remove the Media Loading Lever.
4. Remove the Right Upper Cover.
5. Remove the Right Cover.
6. Remove the Left Rear Cover.
7. Remove the Left Upper Cover.
8. Remove the Left Cover.
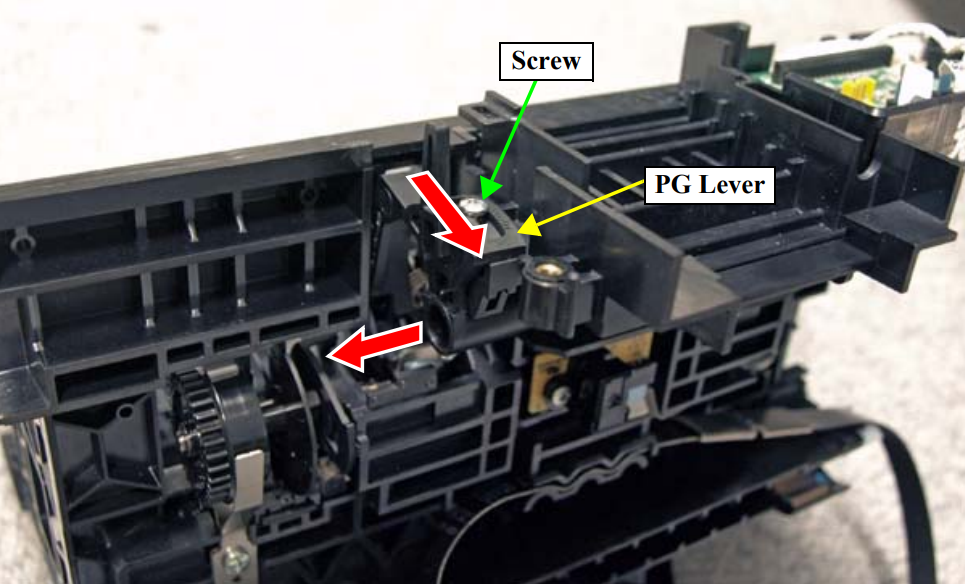
9. Remove the APG Unit.
10. Remove the CR Motor.
11. Remove the CR Cover.
12. Remove the Damper Kit.
13. Remove the Print Head.
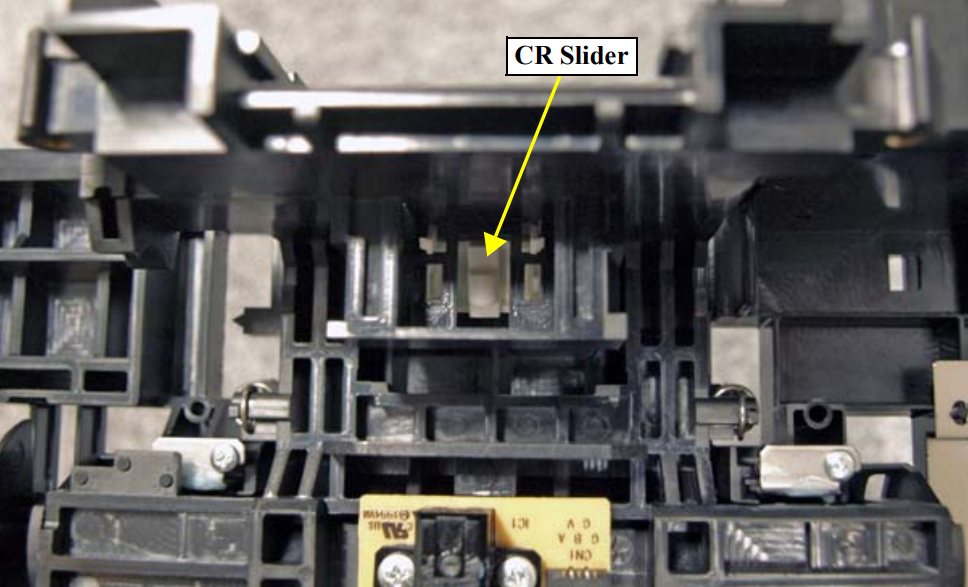
14. Remove the CR Scale.
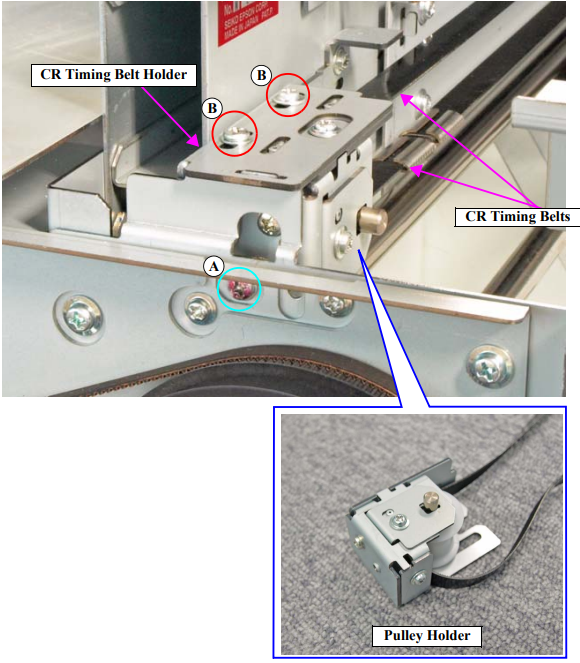
15. Remove the three screws, and remove the Pulley Holder.
A) Black M3x22 screw with washer: 1 pcs
B) Silver M3x6 S-tite screw with built-in washer: 2 pcs
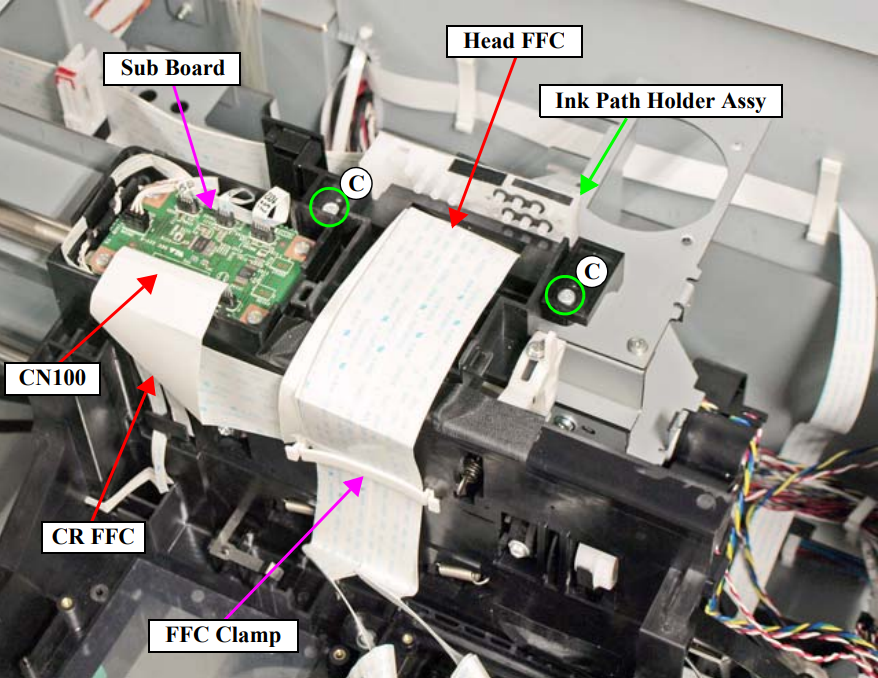
16. Disconnect the CR FFC from the connector (CN100) on the Sub Board.
17. Remove the FFC clamp that secures the Head FFCs.
18. Remove the two screws, and remove the Ink Path Holder Assy.
C) Silver M3x6 screw: 2 pcs

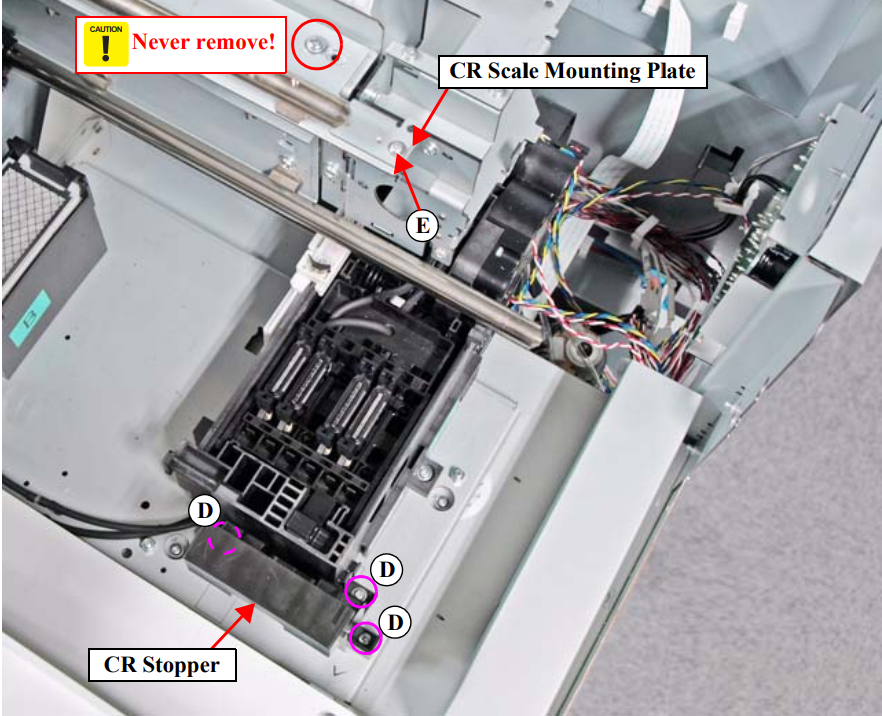
19. Remove the three screws, and remove the CR Stopper.
D) Silver M3x8 screw: 3 pcs
20. Remove the screw, and remove the CR Scale Mounting Plate.
E) Silver M3x8 screw: 1 pcs

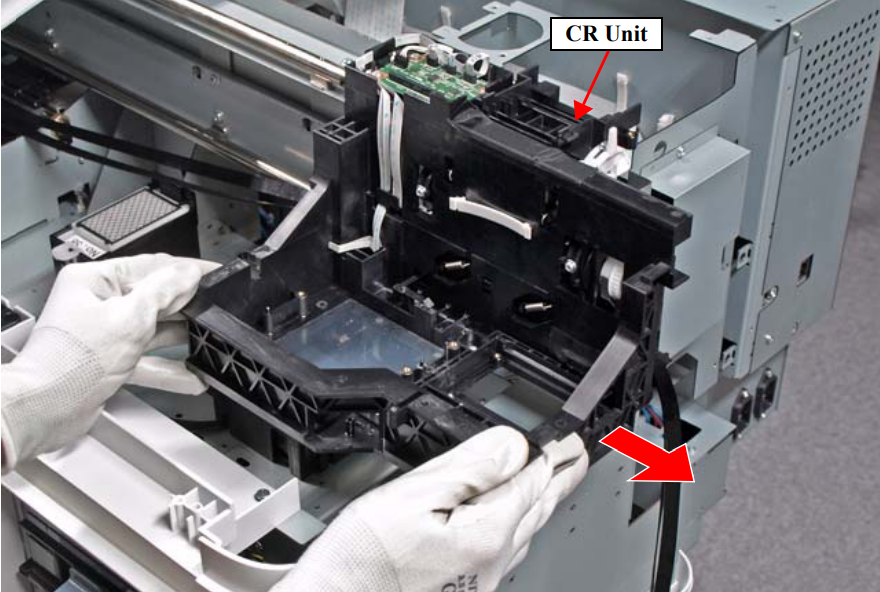
21. Remove the CR Unit by sliding it in the direction of the arrow.


Replace the CR Encoder.

1. Unlock the CR Unit.
2. Remove the Wiper Cleaner.
3. Remove the Media Loading Lever.
4. Remove the Right Upper Cover.
5. Remove the Left Rear Cover.
6. Remove the Left Upper Cover.
7. Remove the Left Cover.
8. Remove the Right Cover.
9. Remove the APG Unit.
10. Remove the CR Motor.
11. Remove the CR Cover.
12. Remove the Damper Kit.
13. Remove the Print Head.
14. Remove the CR Scale.
15. Remove the CR Unit.
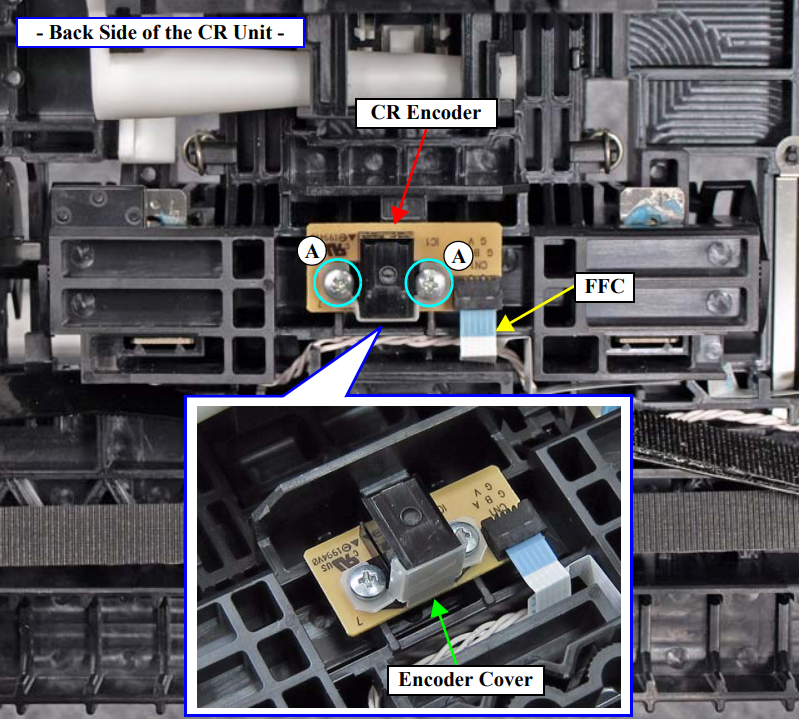
16. Remove the two screws, and remove the CR Encoder and Encoder Cover.
A) Silver M2.5×8 P-tite screw: 2 pcs
17. Disconnect the FFC from the CR Encoder.When installing the CR Encoder, screw it together with the Encoder Cover.
Replace the CR Motor.
When replacing/removing this part, refer to “Adjustment Items and the Order by Repaired Part” and make sure to perform the specified operations including required adjustment.

1. Unlock the CR Unit.
2. Remove the Media Loading Lever.
3. Remove the Right Upper Cover.
4. Remove the Left Rear Cover.
5. Remove the Left Upper Cover.
6. Remove the Left Cover.
7. Remove the APG Unit.
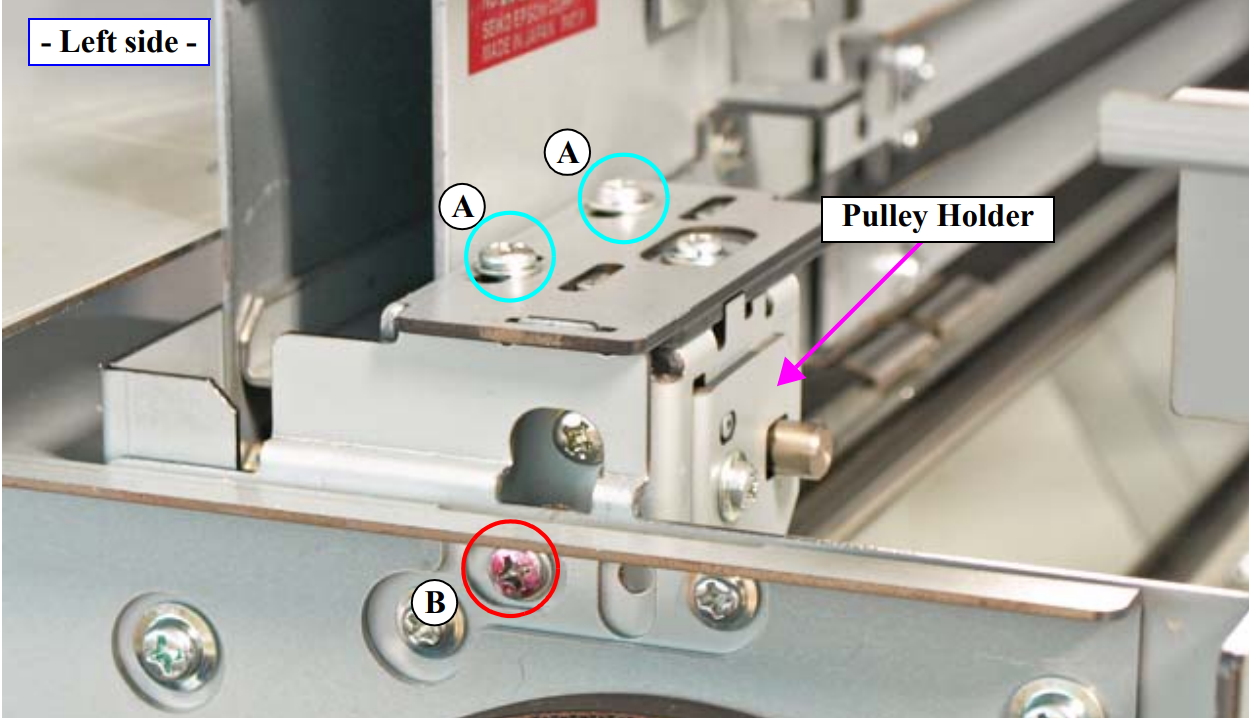
8. Loosen the two screws (A) that secure the pulley holder
Before loosening the tension at the next step, mark the position of the pulley holder to make the required adjustment easier.
9. Loosen the screw (B) to loosen the tension of the CR Timing Belt.
10. Move the CR Unit until to a position over the platen.
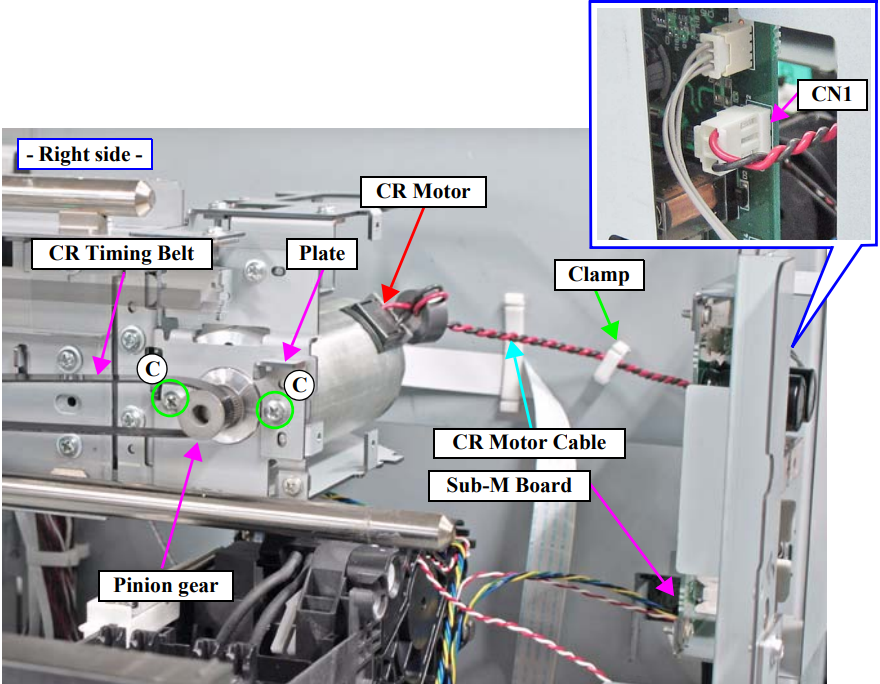
11. Remove the CR Timing Belt from the pinion gear of the CR Motor.
12. Disconnect the CR Motor Cable from the connector (CN1) on the Sub-M Board, and release the CR Motor Cable from the clamp.
13. Remove the two screws and the plate, and remove the CR Motor.
C) Silver M4x10 screw: 2 pcs

When installing the CR Motor, make sure to install it in the correct orientation